Quantcast
Channel: Plugins Reviews and Download free for CG Softwares
Viewing all 573 articles
Browse latest View live

Auto Character Setup 2 kit for MODO

$
0
0
[ #MODO ]
Auto Character Setup (ACS) 2 kit is a production-ready, automatic rigging solution for bipedal characters. ACS 2 simplifies technical tasks with an interactive drag-and-drop workflow that is easy enough for even novice users, but that produces a robust rig suitable for professional use. You can quickly adjust the flexible, general-purpose biped rig to work with a wide range of characters, and enjoy streamlined processes for binding, weight painting and applying corrective morphs. Reuse animation data between scenes or even different characters with the included library of poses and actions. Apply motion capture data with just a few clicks using an optimized retargeting workflow, and animate on top using both FK and IK controls. Once you’re ready, flatten your characters into a simple hierarchy of joints with a single click, ready to export into external applications such as Unity or Unreal Engine.

>> See Also: MODO tutorial


ACS features:

- Easy visual resizing of animation controls to suit users tastes
- Rigs work from a modular design where unnecessary parts can be easily removed (fingers, etc)
- Transportable, ACS rigs can be opened and animated on any system, even without ACS
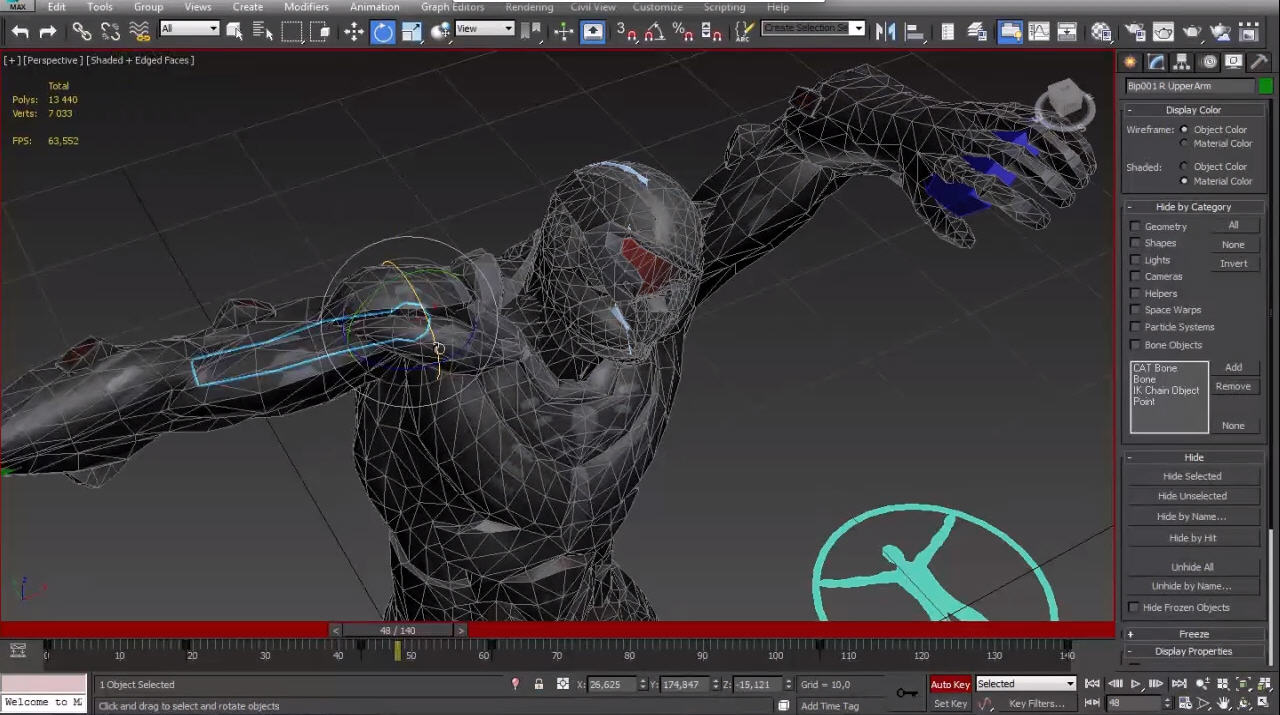
- Configured to use advanced setups with IK/FK blending and Pole vector pinning.
- Options to use Aim or FK controllers on many joints with additional advanced control setups
- Detailed rigs provide animation control over the entire body including eyes and eyelids
- Spine setups have easy to use settings for customizing the joint behavior
- User controlled options to isolate arms, legs and head
- Pre-made hand controllers with Channel haul interface for finger bending and spreading
- Thoughtful pick walking setup allows users to easily select animation controls with only the keyboard

New ACS 2 features:

- Preset-based poses and actions library for storing and reusing animation data across scenes or even different characters
- Poses and actions mirroring tools
- Retargeting support with the ability to animate over motion capture using both FK and IK rig controls (requires ACS 2 rig)
- IK/FK matching (requires ACS 2 rig)
- Squash and stretch controls for limbs and torso
- Bind mesh proxy mode for faster playback performance and the ability to pose a character with rig controls hidden
- Robust selection tools that make it easy to select various parts of the rig; supports MODO’s native item selection sets
- Animation tools for editing keys for either entire character, selected controls or selected channels only
- Dedicated Animate Palette increases animation efficiency
- Support for Mixamo’s rigged characters, which includes the ability to reuse characters’ proportions and weight maps
- Snapshot command for freezing a character’s current pose into a separate mesh layer
- Improved baking that supports baking multiple actions and custom naming schemes for the output skeleton
- Improved preview tools for creating animation previews with a minimum number of clicks


What is included with the ACS kit?

- One Biped Rig preset
- Three Joint Influence presets (Hinge, Free and Roll Joint Influence)
- Two sample character models: Hero and Bolo (downloadable samples on the right hand column)
- Four sample scenes: Hiero Rigged, Bolo Rigged, Bolo Walkcycle Animation, Hiero Run Animation
- A set of example poses for Hiero and Bolo
- Online manual with over three hours of training material

Download:


Auto Character Setup 2 kit for MODO 801 SP4 or greater, MODO 901 here
  More Modo Plugin [post_ad]

Cluster v2.0 for After Effects

$
0
0
[ #AfterEffects ]
Cluster is a script for After Effects which allow you connect the objects in a couple of clicks. All connections is parametric so you can change them in a realtime. The script included 3 basic connections: linear, parent and recursion. You can create a more complex patterns with them.

>> See Also: After Effects tutorial


Cluster v2.0 Basics tutorial


Download:


Cluster works with any version of the After Effects cs5 and up. Runs on Mac or PC operating system. Get it for $16 here!
  More After Effects Plugin [post_ad]

SLiB Floor Generator for Autodesk Maya

IKinema Plugin gives Solver Boost to Autodesk MotionBuilder, Autodesk Maya

$
0
0
[ #Animation #MotionBuilder #AdskMaya ]
IKinema, the leader in real-time inverse kinematics, has announced the launch of IKinema Action for MotionBuilder, the first third party solver for Autodesk’s veteran 3D character animation software package. Based on the same core technology as Action for Maya, Action for MotionBuilder provides superior retargeting, marker solving and rigging capabilities, enabling animators to achieve realism with motion capture data directly within MotionBuilder.

“When customers approached us with mocap pipeline challenges, we saw an immediate opportunity for our solver,” said IKinema CEO Alexandre Pechev. “Thanks to IKinema Action for MotionBuilder, users can now create perfect shoulder, spine and neck movement directly within MotionBuilder in real time, eliminating the need to pass data from one software package to another.”

>> See Also: Animation Tutorial


Framestore is currently working on a major project with significant crowd scenes in which realism is key. “We did an entire day of motion capture then looked at the data – instantly the feedback was great,” said Framestore technical supervisor Gary Marshall. “For the supervisors, it made a world of difference – the shoulders, the spines, the motion in general was looking more natural – validating the reason to use mocap in the first place. As a result, we now plan to use IKinema Action for MotionBuilder for all our post production work.”

Action for MotionBuilder improves the quality of animation and simplifies pipelines:

  -Consistent results from the motion capture shoot through to post processing and animation ensure the shoot is not reinterpreted as it passes through the pipeline, preserving the actor's performance and the director’s creative intent.
  -Post-capture data editing is minimized and raw motion capture data can be passed directly from the shoot to animation and visual effects, with direct interchange between Maya, MotionBuilder and LiveAction for Unreal Engine 4.

IKinema also announced a new version of Action for Autodesk Maya. Key new features include:

  -New rig editor and advanced user interface for games, retargeting and motion capture solving
  -New interface to IKinema LiveAction for Unreal Engine 4
  -Improved speed and optimization for Maya 2016

Action for MotionBuilder and Action for Maya 4 are available immediately via a network of resellers.

  More Animation Plugin [post_ad]

Red Giant Universe 1.5

$
0
0
[ #RedGiant ]
Red Giant Universe 1.5, a set of 95 plug-ins for editors and motion graphics artists. Universe includes popular tools like Knoll Light Factory EZ, Holomatrix, Glitch and much more. All Universe plug-ins are GPU-accelerated, run on windows and Mac, and work in After Effects, Premiere Pro, FCPX and more.

>> See Also: Red Giant tutorial

The new free tools are:

- Universe MisFire
- Universe UnMult
- Gradient Noise Transition

The new Premium tools are:

- CrumplePop Film Transition
- ToonIt Expressionist Noise
- Turbulence Transition

Updates Include:

- Glitch now includes controls for speed and randomization of glitches.
- Holomatrix now works with other effects that come before it.
- ToonIt Cartoon and Paint now include Expressionist Noise options for creating the effect of tight, amplified paint strokes.

What's New in Red Giant Universe 1.5


Download:


Download a free trial here!
  More Red Giant Plugin [post_ad]

RocketComp for Maya

$
0
0
[ #adskMaya #Compositing ]
Halifax, NS, Canada -- July 14, 2015 -- Dover Studios co-founder Andrew Hazelden has released a new Maya plug-in called RocketComp.

>> See Also: Autodesk Maya 3D HoloLens Demo

RocketComp instantly connects Maya to 10 of the most popular desktop compositing applications in use today. With a single click, your entire Maya scene is analysed and a new compositing project file is created containing all of your rendered footage.

The new compositing project contains references to all of the rendered images generated by your Maya scene, along with additional details like the sequence duration, resolution of the imagery, active image planes, render layer names, and render layer transfer modes.
RocketComp is compatible with the following popular composting tools: The Foundry Nuke and NukeX, Blackmagic Design Fusion, Adobe After Effects, Adobe Photoshop, Adobe Premiere Pro, Adobe Illustrator, Krita, Gimp, and HitFilm Pro.

RocketComp works with Maya 2012 to 2016 and runs on Windows, Mac OS X 10.9 Mavericks, Mac OS X 10.10 Yosemite, and Linux 64-Bit systems.

RocketComp will recognize media rendered in Maya using: Arnold, Maxwell Render, Mental Ray, PlayblastVR, and the Maya Software renderer.

Since RocketComp supports scenes with multiple cameras it can handle the complexity of both stereoscopic, and virtual reality compositing workflows with ease.

RocketComp finally eliminates the tedious and repetitive task of creating a new composite each time you render a Maya scene. After using RocketComp for even a single day, it will forever change the way you work.

Pricing and Availability


RocketComp version 1.0 is available today for $249 USD and includes a cross-platform license. For more information check out the RocketComp product page

  More Maya Plugin [post_ad]

MBL PRO 1.1 for Adobe Photoshop

$
0
0
[ #Photoshop ]
Richard Rosenman has announced MBL PRO (Motion Blur Lab PRO) - an Adobe Photoshop (or compatible host) plugin capable of producing high-quality, multi-directional and variable-strength motion blur effects quickly and efficiently using motion vectors.

>> See Also: Download 35 Photoshop Plugins FREE from Richard Rosenman

MBL PRO was developed in an effort to achieve complex motion blur effects difficult to produce with today’s existing digital retouching software. It is of particular interest to professional photographers, retouchers and digital artists everywhere.

MBL PRO features numerous modes of operation for simulating virtually any type of real-world motion blur. Single vector blurs are useful for linear motion blurs. Zoom blurs are useful for depth-driven motion blurs while spin blurs are useful for rotationally-driven motion blurs. Both offer sophisticated ellipticity and orientation options for dealing with varying perspectives. Finally, multiple vector blurs are useful for complex, multi-directional and variable-strength motion blurs. All motion blur types feature various distribution methods such as constant, increasing, decreasing and soft. Motion blur can be introduced to subjects, backgrounds or both.

MBL PRO can work on a single composited image or multiple elements broken up into separate layers. Layers can use transparency for motion blur masking. Additionally, any of these workflows can be combined with selections for area masking and even feathered selections for area masking with falloff.

MBL PRO is 100% multi-threaded capable of using an unlimited number of cores for ultimate speed. MBL PRO supports both 8 bits / channel and 16 bits / channel color modes for professional workflows.

Download


MBL PRO 1.1 for Adobe Photoshop cost $99.99 and it available here
  More Photoshop Plugin [post_ad]

Download ParticleLink Blender Addon

$
0
0
[ #Blender ]
Luca Scheller shares the Blender add-on offers the ability to create links/curves between particles. It is similar to bTrace / IK-Particles Link add-on. This add-on is mostly useful for Motion Graphics

>> See Also: Learn Blender


Download


Download here
  More Blender Plugin [post_ad]

Thinkbox Software XMesh NK Loader for NUKE

$
0
0
[ @thinkboxsoft #Nuke ]
Thinkbox Software has released the XMesh NK Loader. XMesh is a production-proven geometry caching plug-in designed to streamline animation and visual effects pipelines. The XMesh NK Loader allows users of The Foundry NUKE v7 and higher to load XMesh data saved from Autodesk Maya or Autodesk 3ds Max into NUKE for rendering.

>> See Also: NUKE tutorial

XMesh saves animated scene geometry in a compressed format, yielding smaller files for faster loading, manipulation, and sharing across departments and facilities. Channel data that is not changing between frames is deduplicated efficiently, further reducing file sizes. The cross-platform and cross-tool compatible plug-in is easy-to-use and makes for a powerful addition to digital workflows.

The XMesh Loader plug-ins for NUKE, Maya and 3ds Max are available at no cost.
The XMesh Saver plug-ins require a license which can be used in both 3ds Max and Maya.

To request access to the XMesh NK Loader, and evaluate the XMesh Saver for 3ds Max and/or Maya, please contact sales@thinkboxsoftware.com.

  More NUKE Plugin [post_ad]

WeightPro 2.0 for 3ds Max 2013 - 2016

$
0
0
[ #3dsMax #Rigging #Animation ]
Developed by Kamil Małagowski Weight Pro is a c++ 3ds Max plugin for automatic, fast and smooth Skin modifier weighting, no matter if the mesh has good or messy topology. WeightPro 2.0 for 3ds Max is now available as free update.

>> See Also: Learn Animation

It voxelizes the mesh with the skeleton using GPU to calculate the shortest distances between bones and vertices.
It allows you to make adjustments during posing in realtime.
The plugin itself just sets the weights to the Skin modifier, after that you can delete it from the scene, but the weights stays in the Skin mod, so you have skinned character ready to export or further work by someone without the plugin.

What's new in v2.0:

-clamp furthermost weights
-copy bones settings on symmetrical objects
-fully multithreaded calculations
-each module is 64-bit without memory limits
-a few bugs fixed
-a few smaller improvements
-free 30 days trial version

WeightPro tutorial

Download


Download WeightPro 2.0 for 3ds Max 2013 - 2016 free trial here
  More Animation Plugin [post_ad]

V-Ray 3.1 for Autodesk Maya

$
0
0
[ #Vray ]
Chaos group has announced V-Ray 3.1 for Autodesk Maya with over 100 new and modified features, including support for Maya 2016. Let's Check out What's new video below.

>> See Also: Maya Vray Environment Fog tutorial

V-Ray RT GPU now supports:
  -Hair & fur
  -Subsurface scattering
  -Displacement & subdivision surfaces
  -Light Cache GI
  -Anisotropic highlights
  -UDIM textures
  -Texture baking
  -QMC sampling on NVIDIA CUDA devices
Proxy Object improvements:
  -Identical proxy objects are now automatically instanced
  -Improved viewport previews with mesh simplification options
  -Import multiple proxy objects at once
  -Support for hair and particle instances
  -Support for instancing Ogawa Alembic files
  -Mesh viewer utility – to view proxy objects and Alembic files, including subdivision surfaces, particles, and hair

Additional New Features in V-Ray 3.1:

Maya 2016 support
  -Full support for new Hypershade Node Editor, Material Viewer, and Lookdev view
  -Enhanced Bifrost support – including rendering liquids as isosurfaces without meshing
Workflow & User Interface
  -Quick settings
  -Light Lister
  -Tooltips
  -Updated default render settings
Geometry
  -Faster rendering of dynamic meshes, proxy objects, and instances
  -Faster rendering of hair and fur
  -Intel Embree acceleration for hair and fur
  -VRayClipper – for cutaways and sections
Lights
  -Light meter – new helper object for lighting analysis
Global Illumination
  -Updated Light Cache algorithm removes light leaks and improves animation
Volume rendering
  -Probabilistic shading for faster volume rendering


  More Vray for Maya Plugin [post_ad]

QuickScatter for Softimage

$
0
0
[ #Softimage ]
Written by Fabricio Chamon - QuickScatter is an ICE based scatter system targeted at non-techy artists. It completely abstracts complex nodal work from the user and features a simple, easy to use interface. Find inside one-click solution for common particle tasks such as painting density/size, collision avoidance, distribution types and mesh generation with UVs.

>> See Also: Softimage tutorial

Main Features:
- One-click "freeze particles to mesh" button!
- Geometry/Particle avoidance
- Attribute Painting (Size/Density)
- Many distribution controls


Download


More information and Documentation here
  More Softimage Plugin [post_ad]

Corona Renderer 1.2 for 3ds Max 2011-2016

$
0
0
[ #Corona #Render #3dsMax ]
Corona Renderer 1.2 for 3ds Max 2011-2016 is now available with some cool new features

>> See Also: Corona render tutorial


New Features/Improvements

  -Displacement Improvements
  -Corona Renderer v1.2 brings you a completely re-worked displacement which should be much more powerful, stable and less memory-hungry. The new algorithm also creates nicer meshes with less meshing artifacts. We are also planning further displacement enhancements in 1.3 as well.

  -Keep Edges Together
The new “Keep Edges Together” functionality for displacement which many of you requested
  -Corona Displacement Modifier
Displacement is now also available as a modifier – CoronaDisplacementMod
  -CoronaScatter supports VertexPaint
  -Corona Renderer - CoronaScatter VertexPaint support
  -Corona Multimap Texmap Improvement

List of various improvements:


  -3ds Max 2016 Physical Camera is now supported
  -“Area to Render: Selected” is now supported
  -Added support for 3ds Max atmospheric effects
  -Added seed spinner to MultiMap
  -The standalone (simple) Corona Sun has been reworked. It is now targeted and displays proper illumination in the viewport
  -Textures in CoronaScatter now support vertex color as well as other extra mapping channels
  -MultiMap now has 100 maximum slots (some of them are accessible only via maxscript)
  -New improved proxy exporter script
  -Added “override enviro distance” option to z-depth render element
  -Added “override enviro color” option to CTexmap render element


Quick overview of new and improved features in the Corona Renderer 1.2 release


More details about Corona Renderer 1.2 for 3ds Max 2011-2016 can be found here
  More Corona for 3ds Max [post_ad]

Ultraflares v1.0 for Photoshop

$
0
0
[ #Photoshop ]
Richard Rosenman has announced the immediate availability of Ultraflares v1.0 for Photoshop, the ultimate lens flare and light studio for Adobe Photoshop and compatible hosts!

Backed by over a year and a half of research and development, Ultraflares boasts some of the most advanced and realistic lens flare features available today. Ultraflares comes packed with hundreds of presets including over 65 natural flares, over 60 stylized flares, over 35 glints and over 40 light leaks, all modeled after [i]real-world[/i] light phenomena.


Ultraflares is much more than a lens flare plugin; it’s a full feature light studio. Not only does it allow the artist to produce sophisticated lens flares, but also the ability to generate a wide variety of complex camera lens effects including the generation of volumetric lights, glows, light glints, star filters, sun glows, star bursts, film burns & aberrations, light leaks, highlight accents, photo filters, bokehs, lens textures, and much, much more. It is an indispensable tool for 3D artists looking to push their 3D renders to the next level.


Ultraflares features stunningly-realistic iris effects such as spherical aberration, aberration scale, aberration offset and asymmetry for replicating ultra-realistic natural lens flares. Circular completion controls how much of the iris diameter (in degrees) is visible while light distribution, a new and truly unique feature specific to Ultraflares only, controls the illumination across the iris with it’s respective angle. Chromatic aberration can be globally applied to the entire flare while spectral coloring can work on any number of specific objects. Add subtle touches like iris edge ringing to push the realism to the next level.


Ultraflares brings the power of lens textures to the artist’s fingertips. Select any lens texture and watch as Ultraflares realistically illuminates the texture according to it’s lens flare color, location and structure. Choose Ultraflares’ own highly configurable procedural lens orbs object or use custom textures of any kind. Embedded custom textures in compatible file formats such as PSD allow Ultraflares to easily toggle between multiple textures.


Ultraflares is the definitive solution for any hobbyist or professional digital artist, designer or photographer demanding cutting-edge, high-quality lens flares and light effects. Check out the website for a full list of features and detailed flare galleries.

Download


Download Ultraflares v1.0 for Photoshop demo here
  More Richard Rosenman Plugin [post_ad]

V-Ray for NUKE

$
0
0
[ #Vray ]
SOFIA, Bulgaria – August 11, 2015 – Today, Chaos Group launches V-Ray for NUKE, a new approach to lighting and compositing that integrates production-quality ray traced rendering into NUKE, NUKEX, and NUKE STUDIO. Compositors can now take advantage of V-Ray's lighting, shading and rendering tools inside NUKE's node-based workflow.

>> See Also: V-Ray For Nuke Sneek Peak Video


V-Ray for NUKE brings the same technology used on Game of Thrones, Avengers: Age of Ultron, and hundreds of other film, commercial and television projects to professional compositors. Built on the same adaptive rendering core as V-Ray’s industry-standard plugins for Autodesk 3ds Max and Maya, V-Ray for NUKE is ready for all production pipelines.

"V-Ray for NUKE gives me the creative freedom I've always wanted as a compositor; it’s addictive,” said Shahin Toosi, lighting and senior compositor at Lipsync VFX. “I can work on lighting and comp at the same time and see the results right away. There’s no more waiting for a test render to come back from other departments. It's definitely a faster workflow.” 

V-Ray for NUKE gives compositors the ability to adjust lighting, materials and render elements all the way up until final shot delivery. Full control of 3D scenes in NUKE lets compositors match 2D footage and 3D renders simultaneously. For environments and set extension work, this cuts out the traditional back and forth that costs studios valuable time.

“The introduction of V-Ray for NUKE adds a powerful component to a comprehensive pipeline,” said Sean Brice, product manager for NUKE, The Foundry. “By bringing increased creative capabilities and efficiencies to the pipeline, artists can focus more on the creative process, achieving better results in less time.”

Rendering
Multithreaded CPU rendering
Highly optimized, adaptive ray tracing
Precise path traced global illumination

Geometry
NUKE ReadGeo – Alembic, FBX, & OBJ
V-Ray proxy objects – Alembic & vrmesh
V-Ray scene files – vrscene

Lights
HDR image-based environment lights
Rectangular & spherical area lights
Mesh lights
Photometric IES lights
Ambient light
NUKE lights – Direct, Point, Spot

Cameras
NUKE projection cameras – Project3D node
Depth of field
3D motion blur
Spherical, cylindrical, cube & fish eye camera types

Materials
Physically-based materials
Multi-layered materials
Subsurface scattering & skin material
Car paint material
Material overrides
NUKE shaders – Diffuse, Emission, Displacement, UVTILE

Textures
Memory efficient tiled EXR and TX files
Displacement & subdivision
Dirt & occlusion
Fresnel
Ptex
Utility & override textures

Render elements
36 beauty, matte, and utility render elements

Pricing & Availability


V-Ray for NUKE is available now through select resellers. A V-Ray for NUKE Workstation license can be purchased for €750. This includes one floating user license and one floating render node. V-Ray for NUKE can render on existing V-Ray 3.0 for 3ds Max and Maya render node licenses.

For more information visit v-ray.com/NUKE.
  More NUKE Plugin [post_ad]

Luxion Announces Advanced Support for Autodesk Maya and Maxon Cinema 4D

$
0
0
[ #KeyShot #Render #realtime #Cinema4D #adskMaya ]
Luxion, a leading developer of advanced rendering and lighting technology and maker of KeyShot®, the first real-time ray tracing and global illumination program, is pleased to announce new plugin support and advanced import options for Autodesk Maya 2016 and Maxon Cinema 4D, free of charge.

>> See Also: Keyshot tutorial


KeyShot continues to strengthen its support for the widest number of 3D file formats with new plugins for both Autodesk Maya 2016 and Maxon Cinema 4D. These integrations allow user of each software to install a small plugin that adds export of Maya and Cinema 4D files directly to KeyShot. Additionally, users have full LiveLinking support to update model change in KeyShot and may export KeyShot .bip files without the need to have KeyShot installed. Finally artists have a way of utilizing KeyShot directly from within these applications, allowing them to see their visuals sooner in the development process and create final production faster.

The new plugin for Autodesk Maya 2016 add complete export capabilities that allow users to retain model hierarchy as well as material colors and textures. Additional support for animations allow animations to be brought into KeyShot and rendered. The new plugin for Maxon Cinema 4D adds to the existing direct import options available in KeyShot, allowing artists to import and retain model hierarchy, grouped objects and cameras, as well as import animations to complete the rendering faster inside KeyShot. All plugin capabilities for both include:

  -Parts retain materials and layers
  -Maintain hierarchy of objects created in scene tree
  -Objects retain materials, can be unlinked
  -Support of camera and part animations
  -Support for hair
  -Layers independent of grouped objects
  -Support for model units
  -LiveLinking update of models in KeyShot
  -Export to .bip without KeyShot installed

Availability

The Cinema4D plugin is available now from keyshot.com/plugins. The Maya plugin will be available with the release of KeyShot 6.

Current KeyShot users interested in beta testing the Maya plugin may contact beta@luxion.com.

  More Cinema 4D Plugin [post_ad]

SLiB | Leuchtkraft v.1.1 for Maya

$
0
0
[ #adskMaya ]
SLiB | Leuchtkraft (german for "luminosity") is a Maya Plugin that provides an fast and accurate way to set up and controll your lights.

No more trial and error - with a simple mouseclick you place them excactly where you want them to be. All important Light Attributes (Intensity, Distance, Size, Rotation, Contribution, ...) can easily be controlled from a single window.Contrary to other solutions SLiB | Leuchtkraft uses real Lights instead of painting the lights on a high dynamic range image.

Features are:

  -Professional lighting plug-in for Autodesk Maya
  -add, positon and edit lights with unparalleled ease
  -control all lights and related render attributes with an intuitive UI
  -use procedurals or HDR images to map your lights (several HDR images included - more to come with free updates)
  -no more trial and error when placing your (high)lights - place them excactly where you want them to be
  -automatic object light form curve shape creation
  -supported Render Engines atm: Redshift, VRay and Arnold
  -permanent and floating license
  -free lifetime updates

Supported Render Engines:

  -Redshift v.1.2.60+
  -V-Ray v.3.0+
  -Arnold

Availability


SLiB | Leuchtkraft v.1.1 for Maya costs $199.00. Get it here Here
  More Maya Plugin [post_ad]

V-Ray for NUKE Features Overview video

$
0
0
[ #Vray #Nuke ]
Chaos Group has unveiled V-Ray for NUKE with new approach to lighting and compositing that integrates production-quality ray traced rendering into NUKE and NUKEX. And now let's take a look at the video showing V-Ray for NUKE Features Overview

>> See Also: NUKE tutorial


  More NUKE Plugin [post_ad]

RubberHose 1.0 for After Effects

$
0
0
[ #Animation #AfterEffect ]
RubberHose is an After Effect tool that allows you to rig and animate a character in After Effects. It's an open system built specifically for handling the frustrating parts of animation while letting you stay in control of your character's performance and the life you bring to it.

>>How to create Animated Polygon in After Effects

Features are:

  -Freedom from IK
  -Connect everything
  -ShapeLayer based rigging solution
  -Resolution independent


Availability


RubberHose 1.0 for After Effects costs $45. You can pre-Order to save $10 here
  More After Effects Plugin [post_ad]

Massive 8.0 and Massive for 3ds Max

$
0
0
[ #VFX #CrowdSimulation #3dsMax ]
Massive is crowd simulation software which brings the ability to simulate and display 20,000 agents in real-time. According to CG Press Massive 8.0 and Massive for 3ds Max are coming soon as they have announced at Siggraph 2015 in Los Angeles

>>Crownd simulation tutorial

New features in Massive 8.0 include:

  -Ability to run real-time simulations containing 20,000+ agents at 24fps on a single PC – these are not pre-recorded simulations, and they do not use particles. An NVidia Quadro K6000 or Titan X graphics card is required to make it possible to render 20,000 agents at 24fps with sufficient detail. Now previz crowd shots can be easily created in real-time and on-set CG elements can include full, high-quality crowd elements that are truly indicative of the end result.
  -New Parts feature– allows artists to rapidly assemble agent brains by simply dropping in a few pre-made parts. This features allows for the creation of libraries of agent parts that can be reused and shared across multiple agents, and can be updated and maintained independently of the agents. This is greatly beneficial to both beginner and more experienced artists working with asset management systems in large studios.
  -Edit agents inside Maya– In 2013 they introduced Massive for Maya, which is now used around the world for setting up, running, lighting and rendering Massive simulations, all inside Maya. Now in Massive for Maya 8.0 They've added the Massive editor window that allows for editing every aspect of agent bodies. Change any piece of geometry or texture map, adjust shader parameters, adjust rigid body dynamics settings, and add variation. This is bascially the same as a full Massive Jet license, all in the familiar environment of Maya, and still only $3500.
  -Polygon placement– often it’s advantageous to use reference geometry for agent placement in the scene. The “geometry generator” placement primitive has been improved to allow for simple and powerful per-polygon agent placement. With Massive 8.0 a stadium shot of 100,000 agents can be accurately set up in seconds.
  -Generator gaps– a much requested feature is the ability to insert gaps into agent placement. So now random gaps can be introduced using a simple slider.
  -Agents as terrain– agents now have the ability to walk over other agents, as if they were terrain. This is particularly useful when there are a lot of dead bodies in the scene. Another potential use would be insects crawling over each other.
  -Parent to terrain / Lanes parented to terrain– when the terrain model is animated in multiple pieces it can be challenging to adapt agent performances to the wildly varying landscape. Massive 8.0 brings the ability to parent agents to individual pieces of terrain, providing much broader scope for compelling performances in situations in which the terrain model is animated. Parenting of lanes to terrain has also been added, for guiding agents around on the surface of the animated terrain.
  -Terrain file interpolation– when using sequences of geometry files as terrain, dynamics can become unstable. Massive 8.0 solves this by interpolating between geometry files on every step of the dynamics simulation, resulting in much more stable rigid body dynamics.
  -RenderMan RIS– completely rewritten renderer integration for PRMan 19 and onwards, taking full advantage of the new RIS rendering technology.

Availability


More details can be found here
  More Crowd Plugin [post_ad]
Viewing all 573 articles
Browse latest View live


Latest Images